Sunday, December 27, 2020

Pasteurization


Today is December 27.  On this date in 1822, Louis Pasteur was born.  He was a chemist, a biologist and a microbiologist.  He had many extremely important accomplishments including the creation of the first vaccines for cholera, anthrax, and rabies.  And he also developed the technique we now call pasteurization.

By heating a liquid such as milk to a sufficiently high temperature and holding it at that temperature for a short span of time, but not too much, pathogenic micro-organisms are destroyed.  Then the milk is cooled very quickly to just a few degrees above 0 Celsius.  This gives the milk a longer shelf-life and makes it safer to drink.  The same thing is done to fruit juices.  Read up on the process and you will find it to be a fascinating subject.  

There are actually a few different types of pasteurization that utilize different levels of heat and time.  There is even ultra-pasteurization.  Cream is often found in cartons labeled "ulta-pasteurized" in the dairy section of your favorite grocery store.

Some people prefer to drink raw milk that hasn't been pasteurized.  I, myself, have had raw milk many many times in my life and loved it.  No matter whether raw or pasteurized, I will drink milk anytime night or day.  It is by far my favorite beverage -- however, that's a subject for another post.

But thanks go out to Monsieur Pasteur for his discovery of the process which makes it much more likely to find milk and juices at the grocery store whenever we are looking for them.


Tuesday, December 22, 2020

Chestnuts roasting


Chestnuts roasting on an open fire.....

As big a fan as I am of Christmas and of the carol that sings of chestnuts, I have to admit that I've never actually eaten one.  In fact, no one I've ever known has admitted to eating one.  How odd is that....

Here are a few facts about chestnuts.  They are high in antioxidants that I understand become even more potent once the raw nuts are cooked.  They are also high in sugars and fiber, as well as potassium and phosphorous, and they even have a small amount of iron.  They also have anti-inflammatory properties due to the presence of those aforementioned antioxidants.  They grow on deciduous trees which are members of the beech family and which are native to milder regions of the northern hemisphere.

I understand you should not eat too many these as this will result from a bit of gastrointestinal distress due to the resultant gases from digesting them.  Dogs loves chestnuts apparently, but again they should not eat too many or they will also experience a bit of discomfort from the resultant gases.

One of these years perhaps I will actually try roasting them.  Until then, I will be content to listen to the carol every year.

Merry Christmas, everyone!


Friday, December 18, 2020

Molasses spice cookies


Today I am making molasses spice cookies.  These are one of the most popular cookies I make, and not just around the holidays.  To start with, flour is mixed with baking soda, cinnamon, allspice, ginger, and black pepper ... yes, that's correct, black pepper.  Set this aside.  Now we need butter softened to room temperature and then creamed in the mixer until soft and thoroughly creamed.  To this is added brown sugar and molasses.  (I always use unsulphured molasses.)  A spatula will be necessary to occasionally scrape the sides and bottom of the bowl to ensure complete mixing.  Then the egg is added.  At first it will appear that the egg will not be easily combined with the molasses mixture and it will look like a broken mess.  But mix it for a minute or two, and then added the dry ingredients all at once, but only mix slowly at this point, on the slowest speed of the mixture.  Once it appears that all the ingredients are incorporated, remove the bowl from mixer.  Now take the spatula and scrape the sides and the bottom of the bowl and gently mix in any remaining flour.  There is almost certain to be some at the bottom, but don't use the mixer for this.  We don't want to overwork the flour.


And here's how the dough appears when the mixing is completed.  It's a bit shaggy, very soft, and a little clingy on the hands.  So we need to chill this for a few hours.  Once it's chilled, then it can removed and portioned.  I make every cookie with precisely 36 grams of dough that is rolled into a ball.  The balls of dough can be kept in the fridge for a few days or frozen for a month.


The balls of chilled dough do not need to be warmed up before cooking.  The oven is set at 350 F.  The balls of dough are rolled in granulated sugar, and the flattened just a small amount after placement on the cookie sheet.  Once flattened, I always put a little green sparkling sugar on top, right in the center. 


After cooking exactly 12 minutes, they are ready to come out of the oven.  They need to cool for a few minutes on the cookie sheet before being placed on a cooling rack to finish cooling to room temperature.  Want to eat them right away?  Go ahead.  😀  Warm or cooled, they are excellent.  But when still warm they won't be as firm so hold them carefully so they don't bend and fall out of your hands.

This is a great cookie and very easy to make.  Just don't overwork the flour and don't cook them too long.  

Have a great pre-Christmas weekend, everyone!

Monday, December 14, 2020

More posts coming


Good morning, everyone.  It's been a few weeks since I've done a posting.  But I will be returning to my normal activity level this week with posts coming more frequently. 😃

This week I'm planning to make a few different cookies, some banana bread, and some gingerbread.  I have so many things I want to make as part of Christmas celebrations.  I'm also going to be testing out a few different mac and cheese recipes with different combinations of cheeses.  And I'm really hoping to make some pizzas as well.  

Here we are in the middle of the Christmas season and I can think of few things better than celebrating life by making lots of good foods and passing them out to friends and family.  It has been a challenging year with the pandemic affecting everyone is so many ways.  But as we end the year, we can be grateful for many things and look forward to a new year ahead.

So that's it for now.  But I will post again in a few days.  Have a great start to your week, everyone!

Wednesday, November 25, 2020

Posts and photos will continue


Good evening, everyone.

I took a break in fulfilling orders for a bit, and hoped to get back to normal sometime in November.  However, the pandemic numbers are still rising and in fact they are rising at an increased rate.  As a result I've decided to continue the order fulfillment break.  For the time being, no new orders will be taken on brucebakeryandbistro.com.  

However, I will continue to do new posts here, and also I will continue to post new photos on Instagram. 

Have a great Thanksgiving, everyone, and stay safe.

Sunday, November 15, 2020

Nuts - freezing, roasting and skinning


With the holidays coming up, many of the foods I plan to make use nuts, so I have accumulated a lot of nuts that are sitting in my freezer.  Why the freezer?  Storing them in the freezer helps extend their life.  All nuts contain oils and eventually these oils can go rancid which alters the taste of the nuts.  So all my nuts go into the freezer and last much longer than if stored at room temperature.

Roasting nuts is very easy.  Toss them onto a cooking tray and roast them for about 10 minutes at 350 F.  The roasting will fill your kitchen with a wonderful aroma and will intensify the flavor of the nuts.  If you're going to chop them, I would suggest doing that after you roast them.

With hazelnuts you have another problem --- what to do about the skins.  It seems that most of the time it is recommended that you use skinned hazelnuts in baking.  You can buy them skinned but not usually if you get them at your local grocery store.  You usually have to order them from a nut producer and have them mailed; and you can order skinned or unskinned, roasted or raw.  Why skin the nuts?  I usually hear two reasons:  appearance of the finished product and bitterness of the skins.  Taking those one at a time, I think bits of skin ground up or chopped up with nuts actually looks very nice in a cookie or a cake, etc.  And I have personally never noticed a bitterness that comes from skins of hazelnuts.  Consequently, I never skin them.  But if you wanted do it, how would you do it?

After roasting the nuts, the skins will more easily come off than if you try to do it before.  An oft-recommended technique is to pour the roasted nuts onto a large towel, then roll the towel over the nuts and hold the ends  Then start shaking and rolling and rattling the nuts to help them shed their skins.  If you've tried this you know what I know and that is that the skins flake off every where and aren't contained in the towel very easily and then your towel has many many flakes of the hazelnuts embedded in the fabric.  And to top it off, you don't even get all the skins off the nuts.

Here's an easier technique.  Get a large gallon-sized plastic bag, pour the nuts in, seal the bag and then start shaking the bag up and down.  Acting sort of like a rock polisher, this cause the nuts to tumble against each other in the bag and bit by bit the skins come off.  How long you want to do this is up to you.  As for me, I don't mind the skins on.  But try this out and you'll find it will work really well.

Have a great autumn week, everyone.

Sunday, November 8, 2020

National Cappuccino Day


Today, November 8th, is National Cappuccino Day.  The word cappuccino comes from cappuccio, the Italian word for a hood that covers the head.  This was in reference to the Capuchin Friars of the Catholic Church.  It was so named because the color of the beverage was similar to the color of the hoods they wore.

Cappuccino is a blend of espresso, hot milk and steamed milk foam.  It is one of the most difficult espresso-based beverages to make as it requires precision in the amount of milk foam added.

It is thought to have been originally created in the 1600s after a Turkish army was defeated after marching in Vienna, Austria.  When the Turkish army departed, they left behind supplies of a coffee that was found by the locals to be bitter.  So they sweetened it with milk and honey and named it after the Capuchin Order.  Why?  Because one the friars was responsible for rallying the people to defeat the invading forces.   

The modern espresso machine was invented in 1945.  This machine began a big surge in the popularization of the beverage.

I have always been more of hot chocolate drinker.  But every time I see the decorative pattern on the surface of a cappuccino created by a barista, I always have the urge to drink one.

Have a great week everyone.  Enjoy the wonderful fall weather here in Kansas City.

Thursday, October 29, 2020

Icing


Good morning, everyone.  Fall is in full sway here in Kansas City.  It's fantastic that we've already had a bit of snow; not a lot, but enough to call it a real snow, not just a dusting.  Here's hoping for more of the same.  I know many people don't like the snow, but for me it's the best part of winter.  Winter is a great time for cookies, and one I love to have around is my sugar cookie with bright yellow icing.

When I make sugar cookies, I'm particular about the icing.  I make it a very specific consistency every time.  The rough part is applying it.  Over time I developed a neat little trick.

This an icing we're talking about, not a frosting.  There is a difference.  I think of icings as thinner, more liquidy, they flow.  Frostings are thick and can be spread with a knife or a spatula, and they do not flow.  Since icings flow, they are perfect for my neat little trick.


I place a pastry ring on the baked cookie, which has been already cooled.  Since I've tested the process with this icing, I already know how much icing to use, and how long to let it sit.  I put in a specific amount of the icing using cookie dough scoops so that each cookie has the same amount.  The icing slowly spreads outward and down from the center.  And the pastry rings contain the icing flow.  They allow the icing to develop a nice neat circular edge.  I let the icing sit for precisely 10 minutes, and then I remove the ring.  The edge is disturbed just a bit when the ring is removed since some of the icing tries to cling to the ring.  But the icing hasn't completely set yet and so all by itself gravity does the work of smoothing out the edge.  And, voila!, the icing finishes setting.

It's much easier than using a knife or a spoon to apply.  And I'm always happy with the result.  If it's not quite perfect, that's ok.  Perfection is highly overrated.  

Have a great day, everyone!

Monday, October 19, 2020

Two week break


Hello, hello, everyone.  I have had a very busy couple weeks.  So if you go to the website, you'll see that I'm taking a break for the rest of October.  But I will be back in November with more food offerings.

In the meantime, looking ahead I've got a few different items I hope to put out for everyone soon.  So be on the lookout.  They will be announced here as always.

That's it for today.  But next post I promise will be more like usual.  


Monday, October 12, 2020

IDIC


IDIC -  Star Trek fans will know this acronym:  Infinite Diversity in Infinite Combinations.

In our language we have only 26 letters, and look how many words they combine to create.  I've read that the average vocabulary of a grown adult is over 20,000 words, and their passive vocabulary might approach 40,000.  All of that from 26 letters.

In music, there are only 12 different pitches (unless one is using microtonal scales), and there are different octave ranges for those 12 pitches; for instance the piano has 88 keys comprising just over 8 octaves.  All of music combines just a handful of pitches in different octave ranges and different rhythms to create who knows how many musical compositions which have been preserved in writing over the centuries.

The periodic table of elements contains 118 different elements which combine to create everything in the universe.  Just 118!

In cooking, just a handful of ingredients can create something incredibly delicious.  And if you alter those just a bit, then something entirely different results.  Today I'm making some frosted sugar cookies.  The cookie base is made of just butter, flour, eggs, sugar, salt, vanilla and baking powder.  Only 7 ingredients gives us a fantastic cookie.  Yet the same ingredients arranged slightly differently yields something new.  I find this to be incredible.  It's magical.  It's fantastic.

It's cooking.  

Enjoy the autumn day here in Kansas City.  The weather is fantastic and hints of winter will soon start appearing.  I can hardly wait for the first snow.


Tuesday, October 6, 2020

Iced sugar cookies


Hello, everyone.  It has been a bit longer than normal since my last post.  I have had a busy busy week with many things going on.  But I've caught back up and so here we go with another post.

Coming up in just a couple weeks the cookies above will be offered for the first time.  I won't go into explaining a lot about these particular cookies since you can read the details on the main website.  But these cookies are really good, one of my favorites.  Of course, I say that about all the cookies on the full menu.  That's because nothing gets put on the menu unless it is one of my favorites.  

It took me a while to find the packaging I wanted to use for these.  The frosting is set with just a bit of softness so I wanted packaging that would allow me to lay them all out flat to preserve the pristine smooth surface of the frosting.

I love cookies.  Whenever I think of something quick and easy to make for a snack to have around for a day or two, my mind goes to cookies first.

I hope you'll give them a try when they appear on a weekly menu offering coming up.  Have a great week.  Enjoy the beautiful autumn weather.

Tuesday, September 29, 2020

Eclairs - finishing


Eclairs - today lets talk the finish.

First, we need to create a ganache. This is simply a mixture of hot cream and chocolate.  For this ganache, I'm using 1/2 cup of cream and 4 ounces of chopped semisweet chocolate, in this case Ghirardelli which makes a great semisweet chocolate baking bar that is perfect for this sort of thing.  But any good semisweet chocolate will do.


Heat up the cream until is is hot, but don't boil it.  You can put it in a saucepan, but I just set my metal measuring cup on an electric burner and it works just as well.


It's best if the chocolate is chopped fairly small.  If it's not chopped small enough, the hot cream will not have a chance to melt all the chocolate before the mixtures cools and it won't be a smooth ganache.

Add the hot cream to the chocolate and let it sit for 45 to 60 seconds.  Then slowly stir it.  I like to go in small little circles in the middle and then gradually work my way outwards as everything melts and comes together.

Then simply let this sit out at room temperature for a while until it cools.  It will still be liquidy enough to spread.


Now slice the tops off the eclair shells and fill them with your custard-cream mixture.  And then either spoon the ganache over the eclairs or take the tops and dip them into the ganache.  Now you have a finshed eclair.  Pop them into the fridge to chill and the ganache will set.  I like to them sit for a few hours.  Then they're ready to eat.

Eclairs look like they must take a lot of work, but it's not that much, and since you can divide the process up into three separate stages and do each stage at a separate time, the task is easy to schedule around other things.

Soon you'll find them on the menu at brucebakeryandbistro.com.  I hope you will give them a try.

Thursday, September 24, 2020

Eclairs - shells


Eclairs.  Today let's about shells.  Here's what's needed:  butter, a tiny bit of sugar and salt, water, flour, and eggs.  That all.


Heat the water with butter salt and sugar until the butter is melted.  I never let it boil as I don't want to lose any of the volume of water.


Add in the flour all at once and stir with a wooden spoon.  This type of spoon is the easiest of all the utentils to use for making eclair dough, in my opinion.  Once the flour and liquid is combine, still in the pot on the heat, you start stirring more vigorously.  This should be maintained for a few minutes.  The dough will come together and soon you will see a thin film being left on the bottom of the pan.  Now you know it's done.


Toss the dough into a mixer and mix for a minute or so to allow some steam to vacate the dough, and to cool it just a bit.  Then add whisked eggs and mix until they are thoroughly combined.  Finally, turn up the speed on the mixer to medium and run it for about 30 seconds.  Now you have a beautiful dough.


Spoon the dough into a pastry bag.  I'm using a relatively small tip here as I want smaller eclairs with this batch.  But you can do a variety of sizes and shapes of eclair shells.


Make whatever shapes you want, doing this directly onto parchment already placed on a baking sheet.


Into the oven they go at a high 400 degrees.  You want a burst of heat to hit these to make them cook faster initially.  However after a short while, the heat is turned down and the shells are baked for longer time at the cooler temperature.  This stops the expansion of the shells and allows for nice browning on top with a fully cooked interior.


And there you go.  These are relatively small versions of eclair shells.  They can be made bigger and thicker, small and round, whatever you wish.  Once cooled, these are ready to be cut open and filled.

Next up is topping, which will be extremely easy.   A new post on that will come shortly.

Enjoy the fall weather everyone.  It is amazing out there today!

Sunday, September 20, 2020

Eclairs - filling

Making eclairs. Today let's talk about the filling.  Without a good filling, an eclair is just a bunch of baked dough with a bland interior.  The filling is important to get right.  This particular filling is a blend of a custard and whipped cream.  Cake flour, sugar and salt are all whisked together.  The sugar whisked in combination with the cake flour will help ensure that the cake flour won't clump when it is introduced to whisked eggs.  So this mixture of dry ingredients and eggs now sits off to the side.


Milk is scalded. Basically I heat it up until little bubbles start to form on the outer edge.  We don't want it to boil.  Technically scalding has been achieved once the milk reaches about 180 F.  Once scalded, the milk is then added slowly to the egg mixture while whisking.  Then once it's all combined, the entire mixture is poured back into the saucepan.


Now we have to stir constantly for a few minutes.  The mixture will start to thicken.  Once it does, I always stop stirring periodically to see if it is bowling yet.  Once it starts to bowl, I only want it to continue for about 10 seconds, just enough to cook the flour taste out.  Any more and the texture won't be what is wanted.   Remove it from the heat, and pour it through a fine-meshed sieve into a heat-resistant bowl.  At this time, add vanilla extract.  If using vanilla beans, the seeds can be scraped into the milk when it is first in the pan for scalding.  But vanilla extract will not handle that heat well, and should added here at the end.  It's always a good thing to remember that vanilla bean seeds and vanilla extract should be added at different points when going into very hot mixtures.


Now the strained custard will chill in the fridge for a few hours.  Press plastic wrap right up against the surface to keep it all soft and smooth.


Once chilled, it will be unused until we are ready to fill the eclairs.  When that time comes, heavy cream is whipped until very stiff.  Then it is whisked into the custard.  Now we have a cream-infused custard.


And here's what it look like.  If you taste this, it will be amazing.  Lightly sweet, lots of vanilla tones, and wonderful silky texture.


Now it's ready to fill an eclair.  When that times comes, just put it in a pastry bag so that you can pipe it into the eclair shells.  More on that in the next post.  For now, the mixture will sit in the fridge.

That's all for tonight.  Next time:  eclair shells.

Have a great week, everyone!


Tuesday, September 15, 2020

Manual effort

hosta

Summer is just about over.  Fall is on it's way.  Almost all the hummingbirds have already headed south.  I spotted only two today.  Time to start reducing the number of feeders outside, but a couple will be left out for straggler migrating hummers who are still coming down from farther north.


This past week I cut a lot of vegetables for making chili, a savory egg salad, and something else that I for some reason can't recall at the moment.  It can take quite a while to do that, although I have gotten fairly speedy over the years and I use a knife-resistant glove on my non-knife hand to protect it which means I can do it without worrying about a cut.  Someone once asked me why I didn't just buy pre-cut vegetables in containers from the grocery store.  The obvious answer to that is probably that size counts, and one would have to cut all those vegetables anyway.  But another answer is that there is a different feel to cooking if you do it all yourself by hand.  I like taking ownership of that prep process.  I want to cut those vegetables to the size and shape that I desire.  And doing it is actually quite a peaceful and relaxing thing to do.  Of course that can change if I'm on a timetable, but I try not to cook on a timetable.  I like to go at whatever pace I want to go without regard to the clock, without worrying about a deadline.

When you do it all yourself it feels different.  Maybe it's almost like a meditative thing.  I don't know exactly.  But the process is nice.  At least I think so.  Then again, sometimes I have to cut of lot, I mean a lot, of vegetables and I have to admit it wouldn't be bad to have a little help in doing it.  If that help is a second person doing the cutting, then that's great.  Cooking with others is a community thing.  So it's not that I have to do it all by myself as a matter of principle.  I just like to have it done all there in the kitchen where food is being made, I guess.  

The manual effort that goes into cooking is a good thing for the soul.  I think manual effort in anything is good for us.  And cooking by nature will always require a lot of that.  When you do something with your own hands, the final product really does feel different.

Saturday, September 12, 2020

Stuffed cherry tomatoes

spring 2020, back gardens

I've had a nice few days since my last post.  I've worked on some good new piano music, watched some good television, and spent time talking online and playing online chess.  It has been a few days of practically no sunshine here in Kansas City.  Lots of rain means the plants all have a chance to do what they need to for the upcoming winter.  The hummingbirds are feasting, gorging themselves on nectar.  I have 5 hummingbird feeders up between both back and front yard gardens, and they are very active with lots of hummers.  Soon these fun little birds will head down south to escape the winter that it is to come.


I'm working on a new item.  In fact, it's pretty much done.  I just have a tiny tweak or two left to achieve something which I can say is finished and is ready for all who like to try my food.  This is a cherry tomato stuffed with a mixture using a goat cheese base but which includes several other ingredients as well, including fresh herbs.  It tastes so natural and refreshing and light, it's really a challenge to eat only one.  I've never really been a fan of goat cheese before.  Then my brother happened to visit one day and brought some goat cheese to use with some other items we were going to eat.  I tried it and was very pleased to find that I liked it .... a lot.  So I immediately went out to get some and tried it with a stuffed cherry tomato that I had played with a couple years ago but which never quite made the cut for me.  Well, I tell you, with this new goat cheese, it worked.  Either that or my appreciation for goat cheese suddenly burst into existence for some unknown reason.  In any event, I'm going to be adding it to the full menu soon.  I will let everyone know in a new post when that happens, and I hope everyone will give it a try when it hits its first weekly menu offering.

Try to enjoy the seasonal change we are going through as summer ends and autumn begins.  Stay healthy and safe.  And as always, eat well.


Wednesday, September 9, 2020

Microwaves and melting butter

rock pile, mock cairn, or charming landscape decor? 
whatever you want to call it it's in my yard

Can you imagine life without our microwave ovens?  

I have two ways I like to melt butter mostly:  in a metal measuring cup placed on a stovetop burner or in the microwave oven.

The first way is nice because I'm using a small container for this small amount of butter, and, for some reason, I really get a kick out of not using an entire saucepan.  The metal measuring cup can withstand the heat and I've only dirtied one small dish rather than one larger pan.  I can turn the burner on low and just let it sit for a while.  It's easy and efficient.

Of course sometimes I want it melted more quickly.  So this time it goes into the microwave. The problem is that if it heats up too quickly it will rapidly expand, or overboil, or explode.... I'm not sure what exactly it does.  All I know is makes a big mess .

I've learned that if I wrap a ramekin in a paper towel at least that towel will contain the agitated butter.  Of course, sometimes I think I'm going to leave it for a few seconds, and I hit the 30 second timer and then step away thinking I'll only be gone for a part of that time and be right back.  When I'm not, then I am reminded of what I have done by the sounds of exploding butter.  

At this point there are splotches of melted butter all over the top and sides and inner door and rotating tray.  Doesn't really take all that much time to clean up but it sure is a pain.

I've been experimenting with melting butter in a large glass measuring cup, the quart sized ones.  I think it actually allows for faster melting with no exploding butter.  I need to do more testing on this idea.  And then if it really consistently works, I will want to know why the larger sized container in the microwave is better to use than a small ramekin.

Does anyone have the mathematical calculations on that?  Perhaps a doctoral dissertation?  Oh, well.  I suppose it's not really necessary to know for certain why .... but it would nice.  I am an intellectually curious person who hates to be dissapointed.

Have a great week ahead everyone and enjoy the beginning of fall temperatures here in Kansas City.


Sunday, September 6, 2020

Butter and hot water

from my garden


 I don't like synthetics much .... except when I do.  At least when it comes to foods.  Confusing, right? 

This also goes for things that are overly processed.  Powdered milk?  Why bother.  Although once in a while I come across a recipe that uses it and then it's OK.

I dislike imitation vanilla.  But I'm fine with synthetic food coloring because I really don't see a good alternative.  

Bleached flour?  I'm good with it, and in fact prefer it to unbleached.  

Margarine and other processed butter products ... yuck.  I know ... I know ... most people love them and think of them as a great alternative to more costly butter.  There's something I notice about butter that always makes me feel good about using a high quality butter.  (I use Plugra for just about everything.)  When it's on my fingers, I can run it under hot water, and it washes away virtually completely without the need for soap.  That always seems significant to me.  If I have margarine on my fingers, that always requires a bit of soap to completely remove.  So to feel my skin completely free of the oils using nothing but hot water somehow adds to my satisfaction in using that kind of food product in the things I make. 

So I'm an enigma, a cluster  of counter-ideas as to what's OK and what's not.  

That's OK.  Aren't we all?

Wednesday, September 2, 2020

Our favorite dishwares


This morning as I was drinking milk from one of my favorite mugs, I was reflecting on the fact that our kitchens are filled with so many specific pieces of dishware and cookware that become part of our normal daily life patterns.  The photo above contains a small platter and a bistro bowl.  These are Fiestaware pieces from the Homer Laughlin China Company, made here in the United States.  I can't imagine my kitchen without the beautiful colors.  And I certainly can't imagine not eating on these sturdy well-made pieces of dishware.


When I make pasta it often goes into this low broad-based bowl of which I have several, made by Le Creuset.  The broad rim makes it ideal for carrying large servings of all sorts of things.  The soda glass (I have a couple dozen) is excellent for pudding parfaits, ice cream sundaes (and ice cream sodas, of course -- every try a purple cow?) and many other things.  Rugged in structure yet beautiful in form, it's great to be able to pull one off the shelf whenever I need it.


This mug was a gift from a piano student family I work with.  It is part of a small collection of various mugs that all have a story behind them, some sort of narrative as to who gave them to me, or a special memory attached to them, etc., but also actually get used every week at least once.


One of my favorite items:  a set of nested stainless steel cookware made by Magma that is specifically designed for boat owners who have limited space in which to stock their kitchens.  Each set has several pans with lids and removable handles, and everything fits nested inside to become the compact form you see above.  The idea is ingenious and is executed very well.  These are great pans and I cook in them all the time, and they don't take up much space.  I intend to get another set at some point.


This fun mug is a gift from my sister with whom I share a love of birds.  We both have several bird-feeding stations in our yards and compare notes often on the bird activities we see.  This mug carries the image of an American goldfinch.  Goldfinches are frequently seen at the thistle seed feeders in my yard.  I often drink milk from this at the start or finish of a day.  I love the image, and I love the smooth feel from the finish on this mug.

Our homes are filled with so many personal things that speak of who we are.  Kitchens are part of that for many of us who spend a lot of time in them.  I could go on and wax philosophical on this topic, but there's really no need for that, and that wasn't the purpose of this post.  Sometimes it's nice just to take note of something basic since we often take too many things for granted.  And that's all today's post is about:  noticing the beauty and utility of things that often become mundane in our minds as time passes and we forget to appreciate them.


Saturday, August 29, 2020

Vanilla poppy seed muffins with lemon streusel


Yesterday I added a new item to the full menu:  vanilla poppy seed muffins with lemon streusel.

These muffins have a big flavor on top and a mild flavor underneath.  By that I mean that the lemon streusel that tops this muffin is bold and full of flavor and texture, but the muffin underneath is flavored only mildly with vanilla, and also just a bit of lemon zest that is barely noticeable.  This balance of strong and mild flavor means that it works well both eaten plain or spread with butter and jam.  Any jam will do, but my preference for these is raspberry.  

The combination of raspberry and lemon is one that always resonates with me in all sorts of foods.  To me, they both seem to be strong flavors that work very well together since each tends to moderate the strength of the other, i.e.,  each balances the other but neither is cancelled out in terms of the fullness of flavor.

These muffins are made by first combining ingredients for the lemon streusel:  lots of lemon zest, sugar, light brown sugar, flour and melted butter.  Stirred until mixed and a bit lumpy, the streusel is made first and sits in a bowl waiting for the muffin batter.

For the muffins, whisk together flour, baking powder, poppy seeds and salt, and put aside.  In a separate bowl, sugar and lemon zest are rubbed together until very fragrant.  (Not as much lemon zest goes into the muffin as into the streusel.)  Then the sugar/zest is whisked together with eggs and a small amount of sour cream, not long, but long enough to combine thoroughly.  While whisking, slowly pour in melted butter and canola oil.  Then do the same with buttermilk (which helps to promote a soft crumb for the muffin), lemon juice (just a teaspoon) and vanilla.

Pour this liquid mixture over the dry ingredients and slowly fold it all together.

I love the act of folding ingredients. It's a gentle process, slow and meticulous.  I always marvel how different a batter can be that is mixed with a vigorous action (by mixer or by hand) versus one that is folded slowly by hand.  Some batters need energetic mixing.  But others must be folded in order to achieve a desired texture and softness.  In the case of folding, the ingredients are coaxed together, without forcing.  It must be done slowly and with deliberation.

After folding, you now have a mixture ready to go into the oven.  I measure out a specific amount of batter for each muffin.  That way each muffin cup is filled with the same volume, and so each one cooks to the same level of doneness.  Once the batter is in the cups, I smooth it out with the back of spoon, pushing it to the edges of the muffin cups so that they are flat and even.  Then I top each with a generous amount of the lemon streusel.  I don't press the streusel into the batter.  I just let it sit on top.  As the muffin expands as it cooks, the streusel takes the brunt of the heat on top which is just what it needs to give that slightly firm, slightly crunchy texture with lots of flavor from the butter and sugars.  The lemon zest comes through very well as it is not inhibited by the other flavors in the streusel, but it is affected a bit by the brown sugar, giving the zest some dusky flavor overtones.  

After 16 minutes in a hot oven (425 F), they come out and are immediately removed from the pan.  They cool to room temperature and are ready to eat.  These are big muffins, baked in jumbo-sized muffin cups.

Muffins are a great breakfast, a easy tidy snack, perfect food to share with others over conversation at a brunch, even great movie food, in my opinion.  They are a wonderful small food for whenever the mood strikes.

I hope you'll give them a try when they appear on an upcoming weekly menu.    

Tuesday, August 25, 2020

Cornucopia


sweet woodruff

This past weekend was a pretty nice weekend.  I did a lot of cooking.  I listened to some great music while I did all that cooking.  I replayed the 2004 World Series with my brother with the Strat-o-matic baseball simulation game.  And I ate a lot of great food along the way while watching some great movies.  Take out the burst of heat that Mother Nature has given us as a probable last gasp of summer, and I would have no complaints.

My kitchen logo for these past few days should be the horn of plenty, the cornucopia.  I had platters of things scattered around the kitchen as one batch of food was finished and another started.  I made mini cumin buns, a tasty bite-sized bun that is flavored with cumin and that can be topped and filled with many different things.  To go along with those, I made two different egg salads, one creamy and one savory with lots of layers of flavor.  I also made tuna rillettes which go nicely with the cumin buns as well.  I made two different kinds of cookies (part of the weekly menu offerings), braised peas with cream and egg yolks, lemon slush, and vanilla poppy seed muffins with lemon streusel (which will soon be on the full menu).  The only thing I didn't get to make that was in the plans for the weekend was lava field brownies (again, part of the weekly menu offerings).  I use a specific chocolate with a specific cacao content (the % level you see on many packages of chocolate), and unfortunately the global health crisis currently in play has affected supply chains for some things including this particular chocolate.  So, being unable to procure it, I had to tell everyone that the lava field brownies wouldn't be available as planned this past weekend.  Usually I keep enough of all the varieties of chocolates I use on hand so that supplies don't run low.  But this has been an unusual year and supplies of some things are harder to keep on hand than in more normal times.  Sometime soon, you will see the lava field brownies offered again.

But, going back to the cornucopia, I find it tremendously satisfying to put out a bunch different food items all at once.  There's something quite peace-inducing about a table laden with many different types of food.  To see an abundance of edible deliciousness (yes, that's a word...) and to know that so many yummy things are there for the taking, well, could you ask for anything better?

So here's a toast to the end of summer as it approaches, and to harvests of great food whether they are in the fields across the countryside or in your own kitchen.  Fill that horn of plenty and then eat until it is empty, and then fill it again.  

Friday, August 21, 2020

Rolling a spongecake

rolled spongecakes cooling
 

One of my favorite things to make is a roulade.  I make them all summer long.  I make them all winter long.  They are great desserts no matter what the season.  Someone recently asked about rolling them so here's a quick post tonight on that subject. I've done a post on making roulades before, but I'm going to try to explain the rolling a bit better here.

A roulade is a rolled spongecake with filling.  I make mine typically with either blueberry cream filling or raspberry cream.  But they can filled with all sorts of things.  The cake has to be made in such a way that is soft enough to meet the expectations of a cake, and firm enough yet flexible enough to withstand rolling and unrolling.

I take a half dozen eggs and separate the yolks from the whites.  Then I whip the whites into a firm meringue, adding sugar along the way.  The meringue is put aside, and I turn my attention to the yolks.  These are whisked for just a short time, and while they are whisking in the mixer, I prepare a dry mix of all-purpose flour and corn starch.  Then I add a portion of the meringue to the egg yolks, enough to lighten them in order to make it easier to combine them with the rest of the meringue.  I add the lightened yolks to the meringue and also add the dry mixture on top of that.  Then, very gently, with a silicone spatula, I fold all the ingredients together.  Slowly, bit by bit, it is all combined while preserving the air that has been whipped into the the whites to create the meringue.  All of this is carefully spread into a rimmed baking sheet line with parchment paper.  It cooks very quickly, only about 9 minutes.  And when it comes out, it is hot and spongy and already looks delicious.  And it all comes from just four ingredients.  The ratios of these four ingredients are part of what gives it enough structure to roll while being delectably soft.

completing the roll

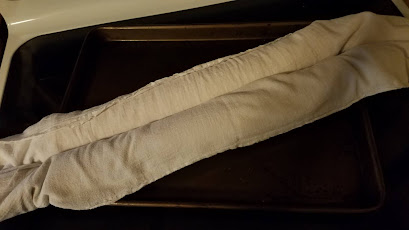
Now I spread out a towel over the still-hot pan containing the sponge cake.  This is not any old towel.  This is a lint-free flour-sack-cloth towel.  It is very thin and is perfect for these sorts of food tasks.  I then flip over the pan and the cake and towel, and the cake is released from the pan, exposing the parchment paper which is then carefully peeled off. 

Now comes the fun part.  Take the long edge of the cake along with the towel and start rolling across the width of the cake.  The towel is rolled up with the cake so that by the time you have finished, you have this cake rolled into a fairly tight spiral with the towel inside the spiral so that no part of the cake is touching another.  And now you let it sit until it cools to room temperature.  Since it's sealed in the towel it won't dry out at all.  I tuck the ends of the towel under the spiral cylinder to ensure that even the end edges stay moist and soft.  This rolling process must be done while the cake is still warm.

unrolling and preparing to fill

Now that it's at room temperature, you prepare your filling and unroll the cake.  It unrolls easily and without breaking.  The first turn in the roll is rather tight as you can see in the picture above.  But it will expand just enough to allow for the spreading of the filling over the entire surface of the cake.

adding the filling

Usually I only add and spread the filling over the nearest two thirds of the cake.  Then as I roll it up again, the filling is forced outwards towards the uncovered third.  No matter what, when the rolling is finished there is going to be a little filling that squeezes out along the long edge.  The same thing goes for the ends of the roll.  But that's OK.  Spoon that off into a bowl and eat it by itself when you're finished rolling the cake.  I suppose you could always put it back into the roll, but it's more fun to eat that excess filling.

ready for cutting

Once it is completely rolled with the filling, wrap it up in the towel by rolling again, only this time the towel is not inside the spiral, of course.  Then put it in the fridge to chill.  With it wrapped up completely inside the towel, the outside will remain soft and will not dry out.  When you're ready, unroll it, and slice it up into whatever portions are desired.  A serrated knife works best for this, such as a bread knife.  I always cut off a half inch or so on each end so that there is a neat and tidy edge.  Guess what I do with that edge cut?  Eat it, of course!

voila!

So rolling a spongecake is not all that hard.  With the right cake made the right way with the right ingredients, you're all set.  It takes a bit of practice and patience.    

Care for a slice?